

“It is important that the tyer collects methods just as they collect materials. Whether or not the tyer exactly follows the methods is not as important as the skill and knowledge gained by the process”. Darrel Martin
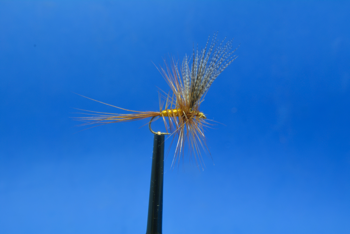
False hackles & beards
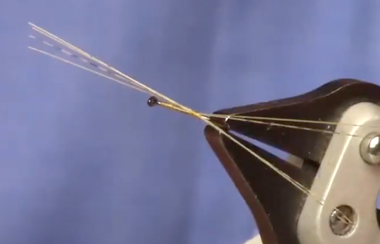
Turn the hook upside down, then take a suitable bunch of web-free feathers and tie them in towards, but not covering, the hook point.
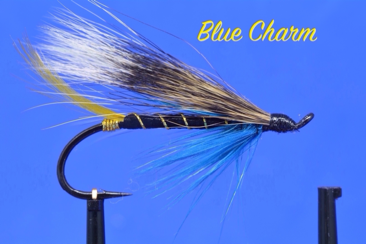
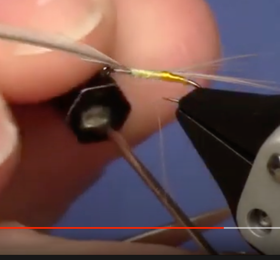
The second method is to tie in the full hackle as normal, then shape the feathers so that they are all facing down towards the hook point and tie in (as per this ‘blue charm’). Alternatively, for some flies e.g. diawl bachs, you can tie the beard in first and leave it pointing forward until you have tied the body and thorax and then shape it back to face the hook point.
Tails
Can be formed from natural materials such as feathers, biots, moose mane and deer hair or synthetics such as paint brush hair or other nylon equivalents. The material should be appropriate for the fly, plus it is normally the first major test of using the correct proportions for the particular fly.
Herl bodies
Mostly referring to peacock and ostrich herl, both exceptional materials. These herls are long, flat and have fuzzy barbules. Peacock herl has been popular because of its colour, reflectivity and movement in the water which makes it particularly attractive to trout. Ostrich herl is also very good at showing movement and can come in a range of colours. Before tying in, remove the very fragile tips, if using three strands of peacock herl you can plait them together first.
Biots
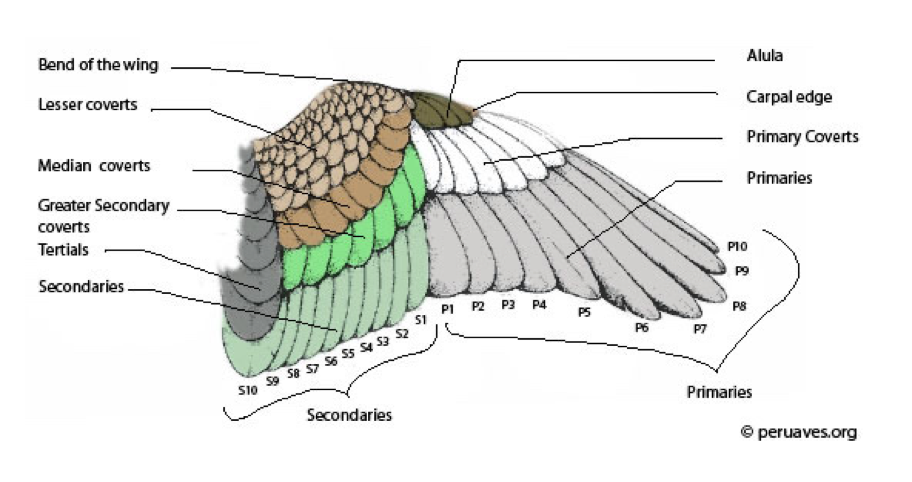
Biots are the leading edge of the flight feathers, i.e. the shorter side.
Primarily turkey or goose, the latter is used for tails and/or wings on nymphs.
Turkey biots are longer and a very popular method of forming segmented bodies on dries and emergers.
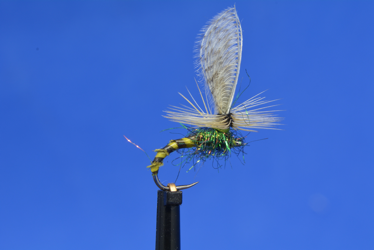
Individual biots are asymmetrical, one side having tiny row of barbules. A wrapped biot can produce either a smooth body or a body with a fringed rib, (as in the photo of the wally wing emerger). To form a smooth body, wrap the biot so that each wrap covers the fringe of the previous one. It is a good idea to reinforce the body by adding varnish to the hook before wrapping the biot.
Quill bodies
In the context of tying bodies, the term quill refers to either; a cock hackle rachis, a stripped length of peacock or ostrich herl and quill like materials such as moose mane, and synthetic types.
Quills can produce very slim segmented bodies, and are generally used on upwing and nymph patterns to give a life like appearance.
The bodies can be delicate so it is a good idea to reinforce and/or coat with varnish or UV epoxy resin.
If you wrap peacock herls over a bed of black thread, then if the wraps don’t meet the segmentation effect will be emphasised.
Floss bodies
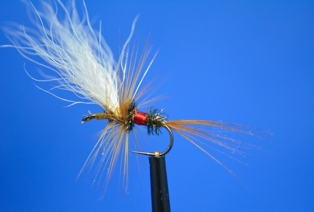
With a wide range of colours, floss bodies are ideal in producing a smooth body in a range of flies. Tie in (normally at the rear) flatten and wind on, ensuring that it doesn’t fray and giving a smooth body. Floss is useful tied around the top of the bend of the hook to act as an attractor or simulate yellow egg laying caddis. It can also be used as ribbing on larger flies, and as breathers on buzzers.
Hair
When we talk about how hollow hair is, it is not hollow like a straw but more like a straw filled with cork. The differences between different types of hair revolve around the diameter and wall thickness. The thickness of the outside wall dictates how compressible it is. Thicker walls can also make the fly more durable. The larger the inside diameter the better it will float.
Deer body hair is hollow at the core, very light, and floats a dry fly well. It is very good for making wings. When wrapped tightly, it flares at a nearly 90-degree angle. When flared it can be clipped to make heads for muddler minnow etc.
After cutting the quantity of hair you want, comb them to get rid of the fluff then put them into a hair stacker to level up the ends.
Tying in can be tricky, depending on the effect you want, 2 very tight turns followed by 2 looser turns to control the flare, or the reverse 2 looser turns the 2 tight turns, you choose the method that works best on the day.
For caddis wings I would often take a wrap around the hair prior to the pinch and grip, and when tightening I would take the thread around the hook and pull directly upwards to secure and control the effect of the torque.
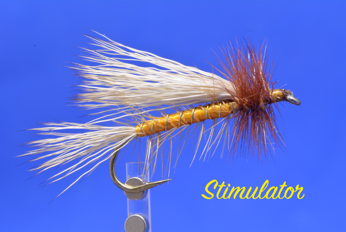
Elk hair, has a moderate flare, is a very versatile and has a large range of natural colours, as well as being commonly available. Especially suitable for the ‘Elk Hair Caddis’, Stimulators and similar flies. It tends to be more durable than deer hair.
| TYPE | USES | COMMENTS |
| Elk | ||
| Mane | Tails | Very fine, almost solid but long |
| Rump | Extended bodies | Coarse, moderate flair |
| Hock | Tails & wings | Stiff, 45-degree flare, spins poorly best for small flies |
| Bull | Wings esp. larger caddis | Flares to 45-degrees, longer than hock, spins poorly |
| Cow | Caddis wings, spinning/stacking larger bodies | More fully flared caddis wings, spins well |
| Yearling | Comparadun, humpies, good for small flies | Uniform diameter fibres, short tip, moderately long |
| Deer | ||
| Mask | Tails | Very hard, can be curved good material if you prefer no flare |
| Rump/belly | Spinning, stacking | Flares well, very long best for larger flies |
| Tail | Tails, wings on larger flies | No flare top third, moderate flare middle third, bottom third most flare |
| Body/Back | ||
| Short, fine | Tails, wings on smaller flies, small muddler heads | Moderate flare |
| Short, coarse | Small comparadun | Flares fully |
| Long, fine | Wings, tails on larger patterns | Variable flaring |
| Long, coarse | Spinning/stacking, muddler heads | Flares fully |
| Moose | ||
| Body | Tails, wings on larger flies | Stiff, coarse, little flare |
| Mane | Tails, quill type bodies | Coarse, no flare |
A good tip that I read is, if you find a patch of hair that was good for a particular job e.g. sedge wings, stimulators or muddler minnow heads. Label the back of the patch with a permanent marker to save you rooting around the next time you come to tie the same patterns.
Calf tail and body hair can come in white which is very useful for bright wings and posts that can be more easily seen on the water. Especially useful when used for wings on the ‘Royal Wulf’ or ‘Quack’ (as in photo, a Catskill pattern developed for an angler with failing eyesight). Don’t bother trying to level the hairs using a stacker.
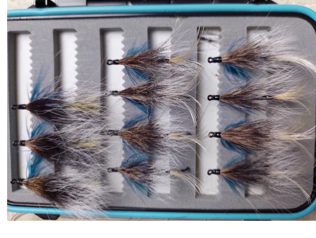
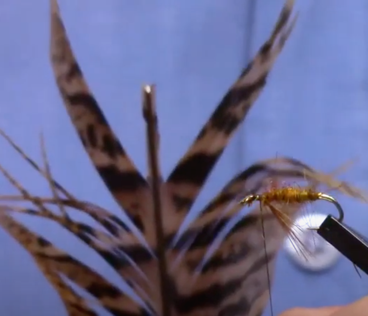
Squirrel tail normally used on sea-trout and salmon sub-surface patterns, as in the ‘Blue Charm’. It is not hollow and does not compress as well. The trick here is to tie in smaller bunches, using thread that is spun clockwise so that it bites in with very tight wraps, then varnish.
Bucktail hair is long and fine and make good wings for lures/streamers. They come dyed in a number of colours. The hair from the top third doesn’t flair, normally used for Clouser minnows. The hair from the bottom third flairs most, and the hair from the centre third flairs a bit and is suitable for tying deceivers.
Wet Fly Wings
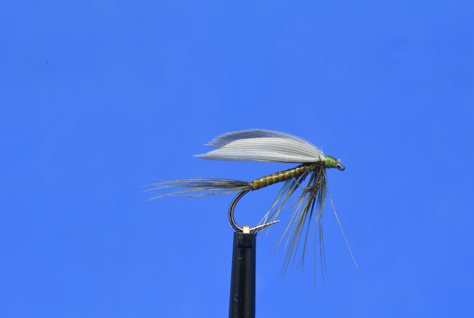
Most often, but not exclusively, tied with either mallard or hen pheasant slips. They can be used as wings on dry flies or more commonly on wet flies. One of the methods that you see being practised less and less, understandably since, as in my case, wet flies are the group I would be least likely to fish with although they are the flies I probably enjoy tying the most.
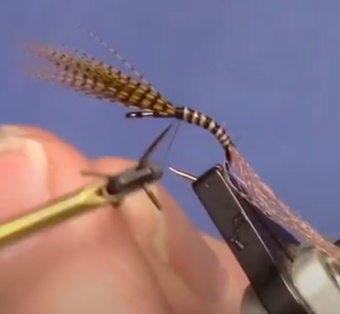
Hen pheasant tails tend to be the easiest, since you can get pairs of slips from the same centre tail feather. With mallard wings you are looking for a pair of matched primary feathers, and taking identical slips from both to make a pair. If I am tying on a size 14 hook, then I would get another size 14 hook, held in hackle pliers, and use the gape to select how wide I want the slip.
To tie in I would first lay down a bed of thread, place the pair of slips in the position that I wanted and pinch and grip the thread before taking it under the hook. To tighten I will pull the thread up vertically so that the torque doesn’t twist the slips on the hook, 2/3 tight wraps should suffice.
Bear in mind that you have a choice of which way round you tie in the slips either the traditional British or the American style, as in the photo above.
CDC wings
CDC feathers are found near the preen gland, the closest feathers are known as ‘puff’. They are extremely soft, short and oily, useful for very small flies. The next circle of feathers are the traditional CDC feathers, and the most useful for tyers.
First method is to simply tie in the hackle by the tip and wrap around the hook until you have achieved the required density.
Second method is to use CDC clips to cut the fibres from the stem, then split the thread, insert the fibres and then wrap around the hook to form the wing.
Third way is to wrap the fibres as before but as you do, use your fingers to shape the fibres up.
Fourth way is to again form the fibres in the split thread but then use a stacker to compress the fibres making a tighter and neater wing.
Dubbing techniques
This refers to the method of applying material (natural or synthetic) to the thread, which is then wrapped around the hook.
Direct dubbing involves twisting the material onto the thread to form a noodle or rope and then wrapping it around the shank of the hook. A point to consider here is that when you wrap the thread around the hook it will tighten clockwise (for a right handed tyer). As evidenced when you release the bobbin it will spin anti-clockwise to return to its normal state. Some tyers will always wrap the dubbing clockwise onto the thread as this action should help to tighten the material. Different materials are harder or easier to apply, I would normally prefer to have a tight thin noodle and do more wraps, rather than having a heavier load of dubbing.
Split thread is another method of applying dubbing, you should spin the bobbin anti-clockwise which will flatten the thread. Hold it against the side of your scissors and then use your dubbing needle to split the thread. Insert your dubbing between these fibres and then hold the thread at the bottom of the dubbing whilst spinning the bobbin clockwise to tighten. Release the thread and the material will be held tightly and you can wrap as normal. This will not work with uni-thread as it does not flatten, our alternative here is to use a dubbing loop.
To form a dubbing loop, we take three or four inches of the thread and form a loop before securing it to the hook. We can us a dubbing twister placed at the bottom of the loop to spin the thread and, once we are happy, wrap the dubbing loop around the hook we can then tie it off and cut away the excess.
When you take out the dubbing to form the noodle, don’t take out a clump just take small wisps of dubbing.
Because the thread will naturally twist clockwise as a right handed tyer I will twist the dubbing onto the thread in a clockwise direction.
With a bewildering variety available, if you want to choose dubbing for a particular fly bear in mind that bye and large, dry flies have slim, smooth bodies, nymph bodies are fuller and emergers are the scruffiest of the lot.
Hackling
There are numerous methods of hackling, it is one of the most interesting aspects of fly-tying. Primarily we are talking about using cock hackles for dry flies and hen hackles for wet flies. The hackle may come as capes (necks) or saddles (back). Prior to starting, extra attention should be paid to sizing the hackles correctly as nothing else can spoil the proportions of a fly as much. Exceptions do occur, such as when you are tying traditional Catskill flies which embrace a hackle up to two or three times larger than normal. This, of course, reflects the materials the tyers had available to them at the time. Also, parachute patterns will normally be tied with hackles a size larger than normal. Is your feather to be tyed in behind the eye or is it going to be palmered along the shank of the hook?
First thing to do is prepare the hackle by stripping unwanted feathers from the stem, or alternatively trimming the unwanted feathers leaving the stubble to aid in securing the hackle. If you are tying in a feather which has a very thick stem at the base it will often be better to tie it in at the tip e.g. partridge or grouse feathers, especially if you are not looking to make too many wraps around the hook with the feather.
Whenever possible/appropriate I like to tie the hackle in first. It can get in the way, a bit, when tying on other materials but, for me, it gives a neater finish, it is more secure and by positioning it first you help to ensure the hook eye is not crowded and you know exactly where to finish the body of the fly.
If the pattern requires a palmered hackle the most common method is to tie from the thorax to the tail, then use the rib to secure the hackle.I will sometimes tie the hackle in at the tail then wind on and secure at the thorax, which means that it is more securely held, as in this Catskill style ‘Queen of Water. Bearing in mind that with a stiff rachis you are trying to secure a round material onto a round hook, it is sometimes a good idea to use pliers to flatten the rachis
Feathers
A major material used in fly tying with a very broad range of applications. The central feature of the feather is the rachis, also known as the stem or quill. Off this stem comes the barbs, then barbules and on the barbules are the hooklets (basically the Velcro of the feather). Capes, or necks, have a wider variety of sizes, but also have a stiffer rachis. Saddles have longer feathers with more consistent sizes and have a finer and more flexible rachis.
Eyes
Probably the most common types of eyes are the barbell type, so called because they are shaped like barbells or hour glasses. They can come in a range of sizes, colours, styles, finishes and materials.
Eyes are normally mounted on top of the hook shank. With lighter materials the fly will ride the hook down, if using heavier materials, it will cause the fly to ride with the hook up. This can be of advantage when fishing deep as it means less snagging by the hook.
Lay a bed of thread down behind the hook eye, position the eyes and figure of eight to secure, the initial wraps being lighter just to secure the eyes in position, then half a dozen really firm wraps. Where the centre of the barbell rests on the hook, build up a couple of mounds either side to help secure them in place. If the eyes are metal then it is a good idea to additionally secure with super glue. Another popular alternative are the stick-on eyes. When using these I will put a small dab of UV resin on to hold the eye in place then harden it. You can also cover the eye with a thin layer of resin to give them some added protection.
Shellbacks
Most commonly used on scud patterns, they are formed from a flexible material which can be clear, coloured, straight or shaped. Preparation involves cutting to the desired width, then cutting a point at one end which will be the end to be tied in. Tie in at the base of the body and stretch it over the back of the fly and finish behind the eye, make doubly sure it is secure before you cut off the waste! Normally you would then rib with monofilament over the top. The material can also be used (especially if black) to form an effective wingcase on the thorax. If you only have clear material it is simple enough to colour with a permanent marker. Some tyers simply cut up clear freezer bags as a source of shellback material.
Weighting of flies
This can be accomplished a number of ways, firstly simply with the choice of a heavier hook. Then using a bead whether a lighter metal type or a heavier tungsten bead. Adding weight to the hook shank can be done with flat lead, copper/gold/silver wire. Even ribbing with metal will add some weight to the fly. As a rule, I prefer to use round (lead free) wire, which I will flatten on both ends to provide a smoother more gradual finish when covering with thread/materials. Additionally, you can add weight by tying in weighted eyes.
In a competition it is important to be fully conversant with the rules covering the weighting of flies.
Beads
Beads add weight and flash to nymphs and lures, they are normally round but you can get them as cones or even in the shape of a mayfly head. They come in brass which can be plated in black, silver, copper, pink, orange and lots of other colours. For a heavier fly you can use tungsten beads, or go the other way and use very light glass beads which don’t add weight but do give the flies some sparkle.
Look for beads that have a small hole on one side and a slot on the other, which allows you to mount them on a hook.
When using them, first lay down a bed of thread which should be sufficient for a tight fit. If you choose you could then use a dab of super glue to reinforce the bead.
A definite advantage of beads for novices is that they ensure that the eye is kept clear, and not crowded with materials.
Wire
Fine wire can be used as a rib, to add some weight and secure materials to the hook, it is good for creating a segmented effect. Sawyer’s pheasant tail nymph is constructed using copper wire (ideally with a reddish tinge) and no thread. Advantages include the variety of available colours which don’t dull, and making the fly more durable.
For the best visible effect when ribbing, tie in at the tail ensuring an even covering of thread on the body. Rib in the opposite direction to that you tied the materials on to the hook. The ribs should be spaced evenly, on nymphs 5 turns is traditional, and then secure.
Tinsel
French tinsel is a thin metallic tape which is coated with gold or silver. Tinsel can be used as a rib or used to cover the whole body, it is suitable for use on all types of flies.
Oval tinsel is wound around a thread core to give it it’s shape. It can give a subtler effect than French tinsel, when used as a rib, Not as suitable for a body material.
Mylar tinsel is two-sided gold and silver, the colour you want uppermost should be tied in face down. Not as durable as French or oval tinsel.
Fritz
Is a cactus chenille which is tied on a thread core. It can be used wherever normal chenille is recommended, in particular on lures and blobs. It is tied in, as chenille, by exposing the core and securing.
There is also a UV version, although the value of UV in tying flies is disputed. Research from the U.S. shows that trout can see UV when young, up to about a year old, then they lose the ability. However, once they have been to sea and return they can see it again.
© 2026 - Hertfordshire Fly Dressers Guild